You are probably acquainted with the well-liked proprietary commercial Norton Ghost package. The issue with such types of programs is that it takes much time for massively cloning systems to a lot of PCs. You have almost certainly also heard about Symantec’s solution to such an issue, Symantec Ghost Corporate Edition. Well, now there’s an OCS (open source clone system) solution known as Clonezilla with multicasting and unicasting!
Password 123
Similar to the Norton Ghost, you can utilize it for cloning an entire hard disk or just particular partitions. It’s very helpful for individuals worried that the disks might fail or that some kind of malicious attack might render the whole, or part, of significant data unusable. The tool can support the majority of file systems (NTFS, FAT, EXT3, EXT2, HFS+, EXT4, and JFS, etc.) and can work with all OSs.Download Steam Mover For Free
In simple words, you can utilize it with any machine for performing the extensive backups. The Clonezilla SE (Server Edition) is capable of cloning up to forty machines simultaneously, which is a huge amount of data. The Live edition is created for single PCs and can backup and restore disks painlessly and quickly. The tool comes as either a ZIP or an ISO file and is simple to install and utilize. The UI is very simple, and all the options are smartly organized.Do RivaTuner Download
You can put it on your removable media and carry it with you to your PC that requires backing up. If you make a boot drive with this app, it permits you to resuscitate the dead systems or at least recover your important data on them, albeit their OS does not boot. So it is also an extremely potent recovery program.Do ConvertXtoDVD Download
Features Of The Clonezilla App:
The Clonezilla download comes with the following features:
- Therefore you can easily clone the Linux/GNU, Intel-based Mac operating system, Microsoft Windows, NetBSD, FreeBSD, Minix, OpenBSD, VMware ESX, and Chromium OS/Chrome OS, no matter its x32 or x64 operating system. For such file systems, just utilized blocks in the partition are stored and restored by the Partclone. For the unsupported file system, sector-to-sector copy is accomplished by the dd in the program.Do Microsoft Office 2010 Download
- A lot of file systems are supported such as ext3, ext2, reiserfs, ext4, xfs, reiser4, btrfs, jfs, f2fs & nilfs2 of Linux/GNU, FAT16, FAT12, NTFS, FAT32, of Microsoft Windows, UFS of FreeBSD, OpenBSD, and NetBSD, minix of Minix, HFS+ of macOS, and VMFS5 and VMFS3 of VMware ESX.
- BT or BitTorrent is supported in a lite server, which is appropriate for the massive clone. The work for BitTorrent mode is accomplished by Ezio.
- One picture restoring to several local devices is supported.
- Based on Partimage (optional), Partclone (default), ntfsclone (optional), or dd to clone or image the partition. However, the tool, having a few other tools, can store and restore not just the partitions but also an entire disk.
- The image file can be on your SSH server, local disk, NFS server, samba server, or WebDAV server.
Clonezilla Offers Professional-Level Cloning:
Although the Clonezilla Live app is created for single system backup and restoration functions, making it perfect for the one-off users, the SE (server edition) version of this tool is suited to broad deployment, maybe in the office environment. It’s able to clone over forty PC terminals at the same time and, when utilized with the high-end hardware that was actually capable of forty-two node clusters, it’s been recorded at the restoring at rates of about eight GB for each minute over a multicast.Do Remix OS Player Download
All types of file systems are supported by this app comprising, but not limited to, VMFS5 of VMware ESX and NetBSD, HFS+ of Mac operating system, NTFS of MS Windows, and different GNU/Linux file management systems. The AES-256 encryption is also provided, which can secure the data access while making transfer and storage safe. Lastly, it’s worth stating that the single image restoration to several local devices is another helpful feature that’s also provided.Do Adobe Photoshop CS6 Download
How Can You Clone The Hard Drive Using This Program?
While there’re a lot of backup apps out there to keep your preferred files secure, very few are able to make a precise copy of the hard disk, complete with bookmarks, passwords, and any other settings you have already customized.
The Clonezilla Live app is a free data recovery and disk cloning app that permits the users to carry out just that. The special live image of the app can be copied to the DVD or USB drive. As the Clonezilla tool boots into the RAM memory, it can simply copy the data on the hard drive to the external drive.Do Copytrans Manager Download
Step#1: Download The App And Prepare The Boot Media
Go to the official download page of the app. Under the CPU Architecture, simply choose amd64 if you’ve an x64 processor > under the file type, select zip if you desire to install the app to your USB drive, and iso for burning it to your DVD. Windows has incorporated support for burning ISO files to the DVD. The users of the Mac system can utilize the system Disk Utility for burning a DVD.
Step#2: Prepare The Backup Disk And Boot The Tool
Connect the backup disk to the system, making certain it’s bigger than your internal hard disk. Keep in mind that any files already on the backup disk will be removed if you clone the internal hard drive using the Clonezilla app.
Insert the Clonezilla Live DVD or USB and boot the PC. You might have to change the UEFI settings of the device for loading from the external drive. Call the PC manufacturer for help with that; when the app first loads, simply hit Enter for accepting the default settings.
Step#3: Begin The Wizard
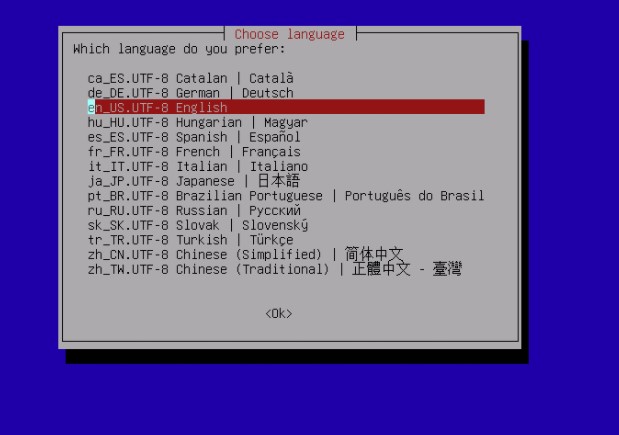
The app will first ask you to select the language. Utilize the arrow keys for moving up/down and enter to choose. The next screen will ask about the options for the key-map. Hit enter for selecting the default; do not touch the key-map option. The next screen will then ask if you desire to Enter Shell or Start Clonezilla. Hit Enter for starting the program itself.
Step#4: Select Mode
The tool will then ask you to select the operating mode. If you desire to make a copy of the hard disk as the disk image, select the first device-image option. It’ll permit you to make the image file, which can then be saved to the directory on your external drive.
The focus of this section, however, is on making the exact copy of the hard disk on some other disk, which can be done by choosing the second device-device option. As its name proposes, it permits you to clone the one drive’s partitions to the other directly.
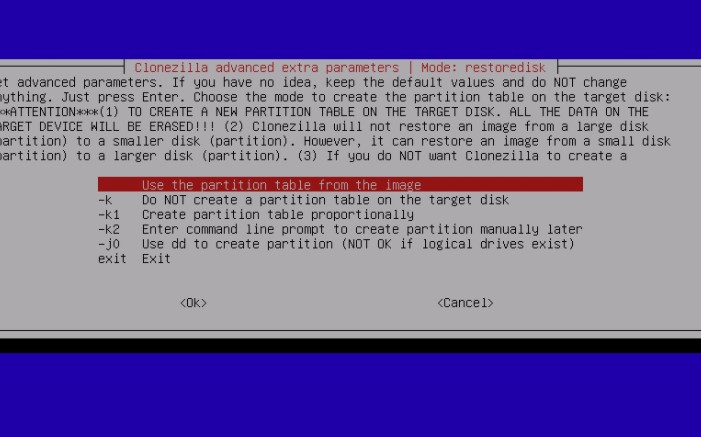
Step#5: Define The Parameters
The program will then ask you to select the parameters before running its wizard. If you just desire to create a drive or partition’s direct copy, then select the Beginner Mode. The Expert mode permits the users to define the more advanced options like running in the text-only mode or cloning all except its boot loader. As such, you ought to always select the Beginners mode. You can also select Exit here for going back to the command line. You can utilize it for running prepared scripts for automating the cloning and backing up the task.
Step#6: Select The Cloning Method
Now you will be asked to select how you desire to clone the disks. The first option will make the exact hard drive copy comprising the partitions like the bootloader and any other you have defined previously. It’s the easiest and simplest method of making an exact hard drive copy.
Select the second option if you just desire to copy one partition of your external hard disk to the list. It just really makes sense if all the personal data is saved on that partition, like a few Linux setups which save user info in /home and have separate places for the system files.
Step#7: Select The Local Disk As Source
At this point, you will be asked by Clonezilla to select the disk you desire to clone, which almost certainly is the internal hard drive. For the individuals unused to the Linux naming conventions, these are prepared alphabetically; therefore, the first hard disk is named sda, the second one sdb, and so on.
If you are unsure, you also might be capable of confirming which the right drive is by checking the capacity of it on the left side. The local drive you desire to copy has to be smaller in size than your external drive.
Step#8: Select The Local Disk As Target
Then select the external disk into which your data will then be cloned. If you just have one external disk connected, it’ll be the only option the Clonezilla tool presents. Keep in mind that your target disk has to have a larger capacity than your local disk, or the cloning procedure will fail.
Once you have chosen the target drive, you will be asked to set additional parameters. In the easiest terms, these are a method for interactively checking and repairing your local file system before cloning. Hit return for selecting the default option.
Step#9: Select What To Do When Done
The app will ask you what to carry out once the cloning procedure is finished. The first option is to keep running and provide you the option of rebooting or shutting down the system. The other options are just for rebooting or shutting down, respectively, once the copy procedure is finished.
Hit Enter for confirming the choice > Enter again for continuing. The tool will show a warning message that the data already on your target disk will be removed during the cloning procedure. Type Y > hit Enter for proceeding.
The application will then ask you if you desire to clone the boot loader of your local disk. If you desire to make the exact copy of your disk, then hit Y > Enter.
Step#10: Begin Cloning!
The Clonezilla program now begins to gather info about your drive partitions. The app can copy various file systems utilizing dd. It’s managed by a tool called Partclone. It’ll open at this stage automatically and start the cloning procedure of copying the data blocks from one drive to the other.
After the procedure is finished, the Clonezilla app will either ask you to restart or shut down or do it automatically, relying on the settings you selected in the previous steps. For restoring the local disk from a backup you just created, just follow the above steps again, making certain to select your local drive as the target disk instead of your cloned disk.